Tutorials: How to Create a Digital Menu Board
Is your restaurant looking to generate more sales but lacking the budget? Digital menu boards can help. Digital menus increase impulse purchases, reduce perceived wait times, and make managing and updating your content effortless.
Yet, implementing them may seem intimidating if you’ve never created a digital menu board before. Creating a digital menu can significantly enhance customer engagement and streamline decision-making in your restaurant.
The good news is that anyone can learn how to create one.
Modern digital signage software makes creating these menus a breeze. Digital boards enhance customer engagement by providing visually appealing displays of menu items, special offers, and real-time updates. Stick around to learn how to create digital menu boards for your business without breaking the bank. A digital menu board solution can streamline menu management and drive sales.
Recommended: 10 Digital Signage Statistics That Prove it Works
Benefits of a Digital Menu Board
A digital menu board offers numerous benefits to restaurants and businesses. One of the primary advantages is the ability to easily update menu items, prices, and promotions in real-time. This eliminates the need for reprinting menus, reducing waste and saving costs.
Digital menu boards also provide an engaging and interactive experience for customers, increasing the chances of impulse purchases and boosting sales. Additionally, digital menu boards can help reduce perceived wait times, making the overall dining experience more enjoyable for customers.
How to Create a Digital Menu Board for Free
All you need to create a digital menu is presentation software like Microsoft PowerPoint or Google Slides. Using PowerPoint as a substitute for professional digital signage software may require a bit more time and creativity, but with a handy guide like this one, you’ll be going in no time. Effective digital menu board design is crucial, as it involves creating a visually appealing and easy-to-navigate layout. Customization options such as fonts, colors, and logos should align with your branding.
Digital menu board software enhances customer engagement through visually appealing displays and real-time updates, ultimately boosting sales and improving the overall dining experience.
If you don’t have Microsoft Office, use the online version for free by signing up for a Microsoft account.
Follow the step-by-step guide below to learn how to create your digital menu board using PowerPoint’s free, online version.
Your first step is to create a new PowerPoint presentation.
1. Open PowerPoint and select New to start a new project. Choose the blank presentation as we will be designing our template.

The default slide will have text boxes already set up. However, we want to personalize the slide, so change the layout to Blank.
2. Right-click anywhere on the slide and choose Layout from the menu. Select the Blank office theme.

Next, set a background color for the slide.
3. Go to the Design tab on the menu along the top of the window.
4. Click Background to reveal the Format Background options.

5. Select Solid Fill to bring up your Color choices.
6. In the Color submenu, choose an appropriate color for the background of your menu. For custom colors, select More Colors at the bottom.
7. You may also use an image for the background by selecting Picture from File. However, avoid anything more than a subtle texture as you do not want to distract your visitors from your menu items.


Now that your background has been set, it’s time to add boxes for your menu items.
8. Go to the Insert tab.
9. Under Shapes, select Rectangle to insert the shape.

A rectangle will appear in the center of your slide. Select and drag to place it.
10. Add as many rectangles as required, resizing as needed. To speed up the process, copy (Ctrl+C) and paste (Ctrl+V) shapes of the same size.

The menu item boxes should be evenly spaced, but that’s difficult to do manually. Thankfully, this is easy to fix.
11. Select each box (Ctrl+click) you want to space evenly.
12. Click the three dots at the far right of the top menu to reveal More Options.
13. Select Arrange.
14. Go to Align.
15. Choose Distribute Horizontally (or Distribute Vertically if your menu items go from top to bottom rather than left to right).

The boxes are now evenly spaced with one another. While they are all still selected, you can move them together as a group to center them on the slide.
Now that your boxes are set up and aligned, you may want to adjust their color and other features.
16. To add color or adjust the other features of a box, right-click on the box to see Shape Styles, Shape Fill, and Shape Outline. From here, you can adjust as desired.

Once the boxes are ready, add the images to your menu.
17. In the Insert tab, select Pictures.
18. Under Insert Picture From, click This Device to find and insert a picture of the menu item from your computer. You can also add Stock Images or photos from Bing’s search results.


When the picture has been added to the slide, select and move it to the correct position. You can adjust the image from the Picture tab in the top menu. Editing options include:
19. Add a Picture Frame.
20. Add a Picture Border.
21. Arrange the picture to Bring Forward or Send Back in regard to other objects, Group with other objects, Align, and Rotate.
22. Crop the image to fit the space you need.

Repeat the process for each menu item.
With your images in place, your next task is to add the text for your digital menu.
23. From the Insert tab, select Text Box.

A text box will appear in the center of your slide.
24. Drag and place the text box in the proper position and enter the menu description.
25. Right-click on the text to change the Font Type, Font Size, and Font Color.
Note: If applicable, use fonts that correspond with your website and other advertising materials in order to maintain consistency.
If you do not have a website or other advertising materials, a quick online search can provide you with recommended font combinations, i.e., what fonts work well together.
Graphic design tip: Don’t use more than three different typefaces in one project.

You can also add an online video to your digital menu board:
26. Go to Insert.
27. Select Online Video.

28. Copy and paste the URL to your video from one of the supported providers.

When you’re done setting up the layout of your slide, you can export it as an image to display on your digital sign.
29. Select File in the menu.

30. Choose Save As.
31. Click Download as Images to save the slide as a JPEG. If you have multiple slides, each one will save as a separate image.

32. Select Download, at which point you will be given the option to open the file or save it.

With your file saved as an image, you can print it out or upload it to your digital signage CMS.
Read More: What is Digital Signage? Here’s How it can Help Your Business

Designing Your Menu Board
Designing an effective digital menu board requires careful consideration of several factors. Here are some tips to help you get started:
Choosing a Template
Selecting a template is an excellent way to start designing your digital menu board. Choose a template that aligns with your brand’s identity and is easy to customize. Many digital signage software providers offer a range of templates to choose from, including templates specifically designed for restaurants and cafes.
Adding Visual Elements
Visual elements such as images, videos, and animations can make your digital menu board more engaging and appealing to customers. Use high-quality images of your menu items, and consider adding videos or animations to showcase your dishes in a more dynamic way. Make sure to balance visual elements with text and other design elements to avoid overwhelming the customer.
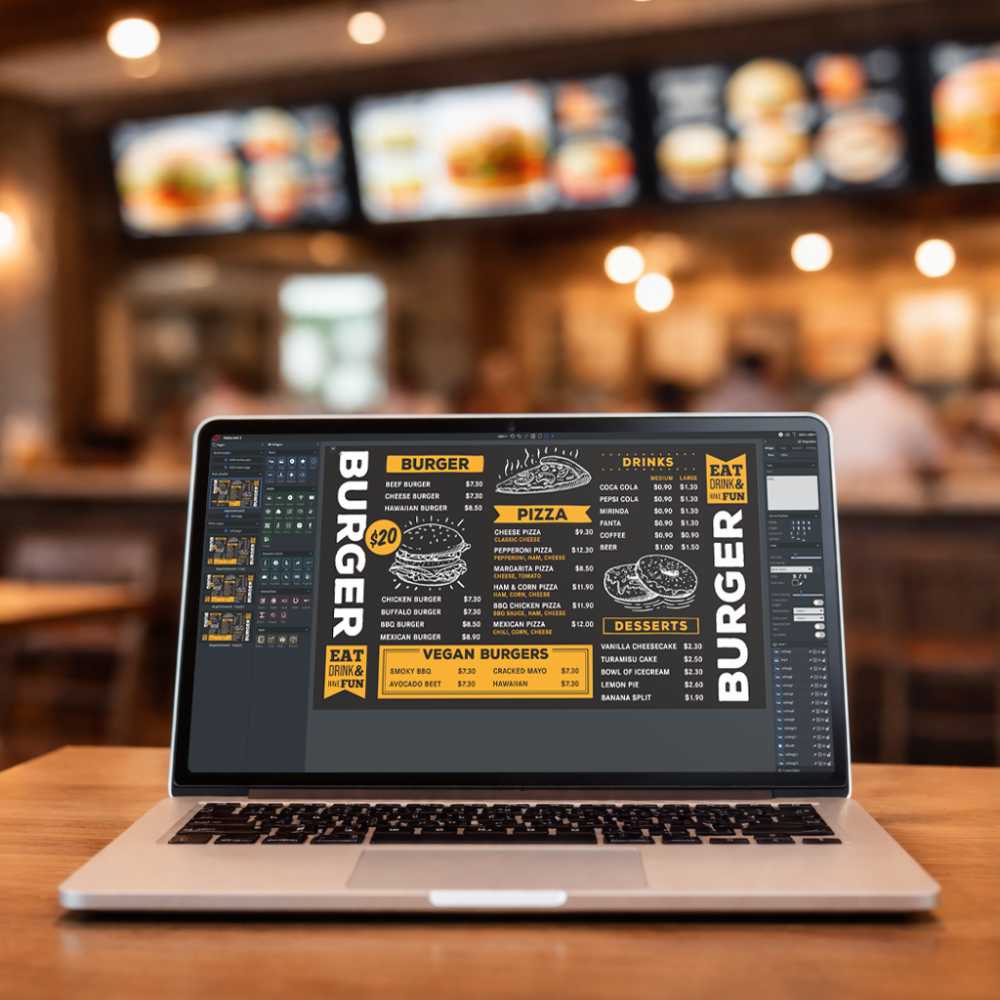
How to Create a Menu Board in Moments with Wallboard

Creating digital menu boards with Microsoft PowerPoint can take some time. If you’d rather avoid the hassle and create a dazzling digital signage menu board in just a few clicks, check out .
Our platform is exceptionally user-friendly, and it contains dozens of digital menu board templates. These digital signage menu boards enhance customer engagement and modernize the dining experience.
Displaying menus and promotions directly on TV screens provides visual impact and real-time content management capabilities.
They’re fantastic starting points that you can fully customize to your heart’s content.
The intuitive drag-and-drop interface is simple and straightforward, making adding menu items more accessible than ever. Here’s a video breaking down the basics of our editor:
Use Wallboard to Create Stunning Digital Menus to Boost Sales
If you're ready to incorporate digital signage into your business, try Wallboard today. Our platform is extremely easy to use, and we offer fantastic support. There's a reason why hundreds of businesses around the globe trust us—because we settle for nothing less than the best when it comes to serving our users.
Wallboard seamlessly integrates with Toast POS, making it easier than ever to manage and update digital menu boards in real-time. Whether you're running a single-location café or a multi-unit restaurant chain, our integration ensures that pricing, item availability, and promotions stay perfectly in sync with your Toast POS system—eliminating manual updates and reducing errors.
As a powerful digital signage solution, Wallboard simplifies content creation, enhances customer engagement, and streamlines operations. With dynamic menu boards, you can effortlessly highlight daily specials, promote upsells, and ensure customers always see the latest offerings.
Feel free to contact us for a consultation with our team and discover how Wallboard can take your restaurant’s digital signage to the next level.

.png)